
STEP 1. REMOVE & CUT
Start by raising the hood of the vehicle and locate the 4 screws/clips that secure the upper half of the front bumper to the radiator panel. The 2 outer screws can be removed using a Philips head screwdriver and a small flat head screwdriver to unclip the 2 on the inner side. Note these can be slightly varied by year model but removable all the same. Now using a power saw or multi-tool with a fine, narrow blade, cut out the section of the lower grill leaving 1 vertical bar on each side and 1 horizontal bar which will be at the bottom (31.5" bracket).
Tip: A Stanley knife blade can be used to tidy up the edges of the cutout.


STEP 2. PLACE BRACKET IN POSITION
Now depending on what you find easiest to slip the bracket into the position, pull back the top of the upper front bumper enough to pass it through being careful not to put too much strain on the bumper whilst pulling up to avoid any damage.

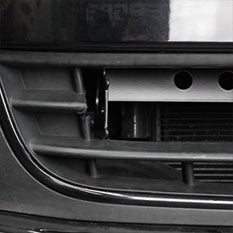

STEP 3. SECURE BRACKET
Looking down roughly behind the license plate you will see 4 holes located in the bumper support. place the 4 supplied bolts through the holes and position the bracket in place. Tighten the nuts and bolts firmly to the bumper support. Using a socket wrench with an extension will help dramatically with access to the top of the bolts. Any spanner or an adjustable wrench can be used to hold the nuts in position as you tighten from the top or vise versa.


STEP 4. LIGHT INSTALLATION
Now the bracket is installed firmly, all that is left is the fitment of your ST3K which is fairly straight forward. You will need to be a little bit nimble to tighten as the side screws on the light bar can be a little tricky to access. Adjust the tilt of the bar directing to your preference and you're all set.


